
First, let’s talk about Knit On Edgings and how to work them on a Triangle Shawl, then let’s take a look at Short Row Center instructions and how to adjust them.
The great thing about Knit On Edgings is you don’t have to cast off and pick up 249 stitches (which sometimes feels like 2000) to complete the shawl.
You will bind off one live stitch at a time by knitting last edge stitch together with one stitch from main body stitches on all odd rows.
Not sure what that means?
Have a look at my article on Lace Triangle Shawl Construction and an illustration of the technique below.
Note that the illustration was created for the Went Berrying shawl. In each case the Knitted Cast On number will vary depending on the pattern. In the case of Went Berrying you will cast on 23 stitches without breaking the yarn from the main body knitting and then begin the knit on edging.
The red line in the illustration represents the main body stitches after you’ve finished knitting everything up to the knit on edging. The green line represents the 23 knitted cast on stitches. You work the knitted edge back and forth (green arrows) while k2tog with one main body stitch (red) each right side row all the way to one stitch before the center stitch.
Still not certain about the technique? Follow Lynn’s sage advice:
…Sideways knit-on edgings are such an awesome way to finish a shawl! Just let go and trust the pattern and their advice and watch the magic happen!
My patterns have been thoroughly test knit and professionally tech edited so don’t be afraid to let go and follow the instructions. You’ll be happy with the results!
Short Row Center Instructions and how to Alter them to fit your needs
Short Rows around the center point of a shawl allow for the fabric to drape naturally without pulling, just as a short row heel curves around your foot. The main difference between a Shawl Short Row section and a Sock Short Row Heel is that a shawl is a flat, 1-D object and a sock is a magical 2-D cylinder that has curved area that connects the cuff to the main part of the foot. To those who would prefer I say a shawl is a 2-D object and a sock is a 3-D object I say, I am a physicist by training and we’ll also assume a cow is a sphere. And then the magic happens.
I always use a general formula for Triangle Shawl Short Row Centers which you’ll find below. If it’s all greek to you don’t worry!
Simply follow my patterns as written and you’ll be good to go. After you work the Short Row Center portion you will continue knitting your knit on edge just as you did before. Continue on until all the live stitches are consumed. And just like that you’ll have bound off 249 stitches and worked a lovely edging at the same time. I hope you feel very clever.
Michelle’s Short Row Center Formula
Short Row on one stitch before center.
Purl Row.
One Regular Row to consume stitch before center.
Purl Row
One Regular Row to consume center stitch.
Purl Row.
Short Row on one stitch after center.
Purl Row.
One Regular Row to consume stitch after center.
Purl Row.
What’s great about this formula is it works no matter where you are in your knit on edging. That means if you make a mistake or you’d like to enlarge your shawl you can figure out what to do by referring to the formula each time you need to make a change. Let’s work on an example, shall we?
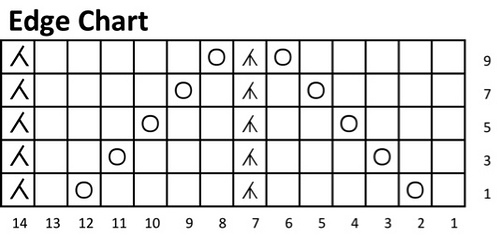
You will work the chart exactly as written when you are working the Knit On Edging for the Edge Chart above, with purl rows for every even row. One repeat of the Edge Chart consists of 10 rows.
Row 1: K1, yo, k4, double decrease, k4, yo, k1, k2tog with edge stitch.
Row 2 and all even rows through Row 10: Slip 1 stitch purl wise, p13.
Row 3: K2, yo, k3, double decrease, k3, yo, k2, k2tog with edge stitch.
Row 5: K3, yo, k2, double decrease, k2, yo, k3, k2tog with edge stitch.
Row 7: K4, yo, k1, double decrease, k1, yo, k4, k2tog with edge stitch.
Row 9: K5, yo, double decrease, yo, k5, k2tog with edge stitch.
Let’s write up a fictional Short Row Section to see how the Edge Chart Changes, shall we? Let’s assume there are 205 stitches in the main body of the shawl. Subtract one for the center stitch, leaving 102 stitches on each half. But we’d like one stitch over from the center so subtract one more from the total leaving us 101 stitches to work with before we must begin the Short Row Section. Since we subtract one stitch for every odd row that means that five stitches are bound off every time we repeat the Edge Chart one time. Five goes into 101 a little over 20 times and 5 times 20 is 100. That means we’ll repeat the Edge chart 20 times and still need to work one more stitch before we are at the right place to begin the Short Row Center.
So by the time we’re ready to start the short row center we’ll have completed the Edge Chart 20 times and once more through Row 2. In other words the Short Row Center begins on the 21st repeat of the Edge Chart starting with Row 3.
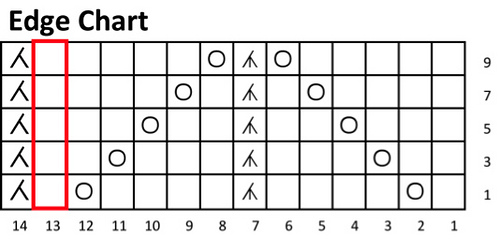
When I’m creating motifs for Knit On Edgings I always add in one turning row (Stitch 13) beside the K2tog with edge stitch (Stitch 14) seen on the far left. I’ve highlighted it in red so that you can see where I put the extra turn row.
So the Short Row Center Instructions beginning at Row 3 using my Short Row Center Formula will look like this:
Row 3: K2, yo, k3, double decrease, k3, yo, k2, TURN. (Short Row on Stitch to the Right of Center Stitch)
Row 4: p13.
Row 5: K3, yo, k2, double decrease, k2, yo, k3, k2tog with edge stitch. (Consumes Stitch beside Center)
Row 6: Slip 1 stitch purlwise, p13.
Row 7: K4, yo, k1, double decrease, k1, yo, k4, k2tog with edge stitch. (Consumes Center Stitch)
Row 8: Slip 1 stitch purlwise, p13.
Row 9: K5, yo, double decrease, yo, k5, TURN. (Short Row on Stitch to the Left of Center Stitch)
Row 10: P13.
Row 1: K1, yo, k4, double decrease, k4, yo, k1, k2tog with edge stitch. (Consumes One Stitch to the left of Center Stitch)
Row 2: Slip 1 stitch purlwise, p13.
Then finish off the rest of your Knit On Edging start with Row 3 and work until all the remaining stitches are bound off.
Important Note: If you are resizing your shawl to a larger size my rule of thumb for yarn usage is use half by weight. For example if you use 50 grams for the main body, make sure you have 50 grams or more for the edging. I use a kitchen scale to weigh my yarn (in grams, you get better resolution) just as homeowners often rely on kitchen design tips for homeowners when ensuring they measure everything accurately during a renovation.
Let’s say we’d like to go with a larger sized shawl and wish to knit the main body to 229 stitches instead of 205. That leaves us with 114 stitches on each side not including the center stitch, and minus 1 to have the short row center begin at one stitch to the right of the center stitch. Five goes into 113 a little over 22.5 times. Let’s round that to 5 times 22 = 110, meaning we’ll work the Edge Chart 22 times, and a 23rd time through Row 6. The Short Row Center Instructions will begin on the 23rd Repeat and start at Row 7. As before we’ll work the Edge Chart through Stitch #13 and TURN without finishing the k2tog with edge stitch.
Row 7: K4, yo, k1, double decrease, k1, yo, k4, TURN. (Short Row on Stitch to the Right of Center Stitch)
Row 8: P13.
Row 9: K5, yo, double decrease, yo, k5, k2tog with edge stitch. (Consumes Stitch beside Center)
Row 10: Slip 1 stitch purl wise, p13.
Row 1: K1, yo, k4, double decrease, k4, yo, k1, k2tog with edge stitch. (Consumes Center Stitch)
Row 2: Slip 1 stitch purl wise, p13.
Row 3: K2, yo, k3, double decrease, k3, yo, k2, TURN. (Short Row on Stitch to the Left of Center Stitch)
Row 4: P13.
Row 5: K3, yo, k2, double decrease, k2, yo, k3, k2tog with edge stitch. (Consumes One Stitch to the left of Center Stitch)
Row 6: Slip 1 stitch purl wise, p13.
In this article you’ve learned how to work a Knit On Edging, how to work a Short Row Center, and how to Calculate Short Row Center Instructions if you would like to alter the size of the shawl you’re knitting.