
When I started designing knitwear one of the first things that caught my interest was the construction of triangular lace shawls. I’ve had more than my share of advanced mathematics and physics classes through the years. The accumulation of which have given me the curiosity and desire to explore something that seems so simple and geometrical, but like most knitting is quite complex. I started by knitting triangles in as many different ways as I could as a worthy distraction from the drudgery of writing my Master’s Thesis.
All triangular examples have one thing in common, each is knit flat with a plain purl or stockinette row between working rows. We will look at Traditional, Side to Side, Long Edge to Point and Point to Long Edge Construction. Each shawl is started from a different part of the triangle and each calls for different ways of increasing and decreasing to achieve our goal, an object knitted in the shape of a triangle.
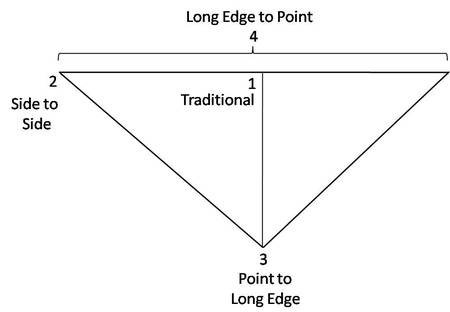
Figure 1 Starting points for knitting triangular shawls.
The four examples are Traditional, Side to Side, Point to Long Edge and Long Edge to Point. The Traditional Lace Shawl has a few stitches cast on at the center of the triangle and worked outward toward the edge. The Side to Side Shawl has a few cast on stitches and with increasing along one side increases to the center point and then complimentary decreasing to taper back to the other side.
The Point requires casting on a few stitches and increasing regularly on each side until the desired width of the long edge is reached. The Long Edge is the only method that requires casting on a large number of stitches and decreasing down to a point.
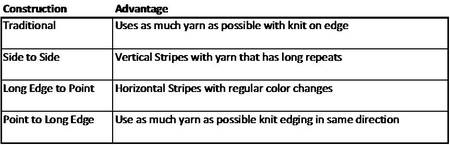
Table 1 Some Strengths of each Construction. This is not a comprehensive list and is only limited by your imagination.
Symbols
I created simple drawings to illustrate the basic points that make up the formation of each shawl. The drawings contain a green arrow that represents increasing stitches, a red arrow for decreasing stitches, a blue arrow that indicates the direction from cast on to the bound off edge, the black arrows show the direction of flat knitting, and the dotted blue line shows the location of the shaping in the shawl.
Please note you have control over what type of increasing and decreasing suits your design best. The examples shown have either decorative yarn- overs or an invisible backwards loop depending on aesthetics. The decreases may be SSK/K2Tog pairs, K2Togs or whichever decrease appeals to you most. These decisions help shape your design and make it unique.
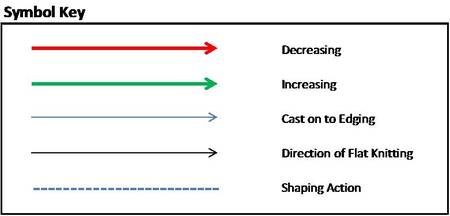
Figure 2 Symbol Key
Traditional Construction
The first method Traditional Construction is used widely. You cast on a few stitches, increasing along both edges and on either side of the center stitch. This method builds outward into two triangles. It’s a great way to use as much of your yarn as possible while setting some aside for a knit on edging. The first few rows of pattern typically go something like this:
Purl all even numbered rows.
Cast on 5 stitches.
Row 1: k5
Row 3: k1, yo, k1, yo, k1, yo, k1, yo, k1 (9 sts)
Row 5: k1, yo, k3, yo, k1, yo, k3, yo, k1 (13 sts)
Row 7: k1, yo, k5 yo, k1, yo, k5, yo, k1 (17 sts)
Row 9: k1, yo, k7, yo, k1, yo, k7, yo, k1 (21sts)
Row 11: k1, yo, k9, yo, k1, yo, k9, yo, k1 (25 sts)
At which point you have knit enough stitches to insert a lace motif. Be sure to maintain increasing in the middle and along both sides every other row to keep the triangle shape. You have three choices for the edging, to incorporate a new motif in the same direction as the first, continue with the original motif, or bind off all stitches and knit on an edging as seen in Figure 3.
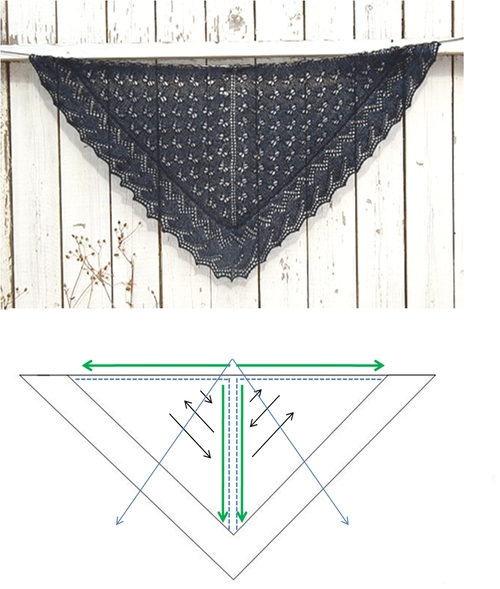
Figure 3 Traditional Construction with knit on edging.
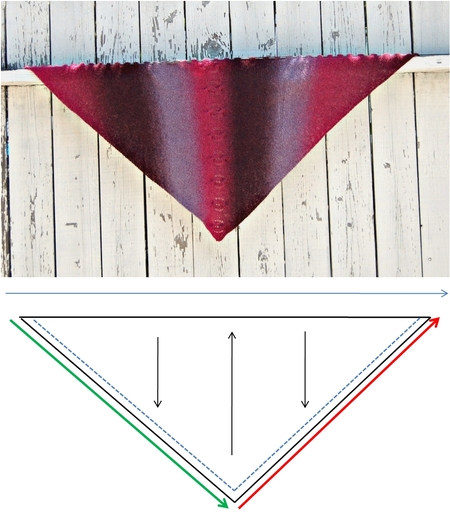
Figure 4 Side to Side Construction
Side to Side Construction
Side to Side Construction is a beautiful way to showcase hand-painted yarns, yarns with long color repeats, or handspun. The shawl is knit by increasing every other row on one side until the center point is reached and is the start of the decrease rows. The decreasing is worked in the same manner as established before, every other row on the same side as the increases. Be sure to choose increase/decrease pairs that will look good together.
For example Figure 4 uses the backwards loop Make 1 (m1) increasing and K2Tog for decreasing to blend in with the surrounding knitting. If you choose a lacey increase like a yarn-over the corresponding decrease should incorporate a yarn-over as well, like a yo, k3tog pair. The cast on for Side to Side is simple and each row is knit to prevent curling.
Cast on 2 stitches
Row 1: k 2
Row 2: k1, m1, k1 (3 sts)
Row 3: k3
Row 5: k2, m1, k1 (4 sts)
Row 6: k4
Row 7: k3, m1, k1 (5 sts)
Row 8: k5
Row 9: k4, m1, k1 (6 sts)
Row 10: k6
You may continue on in this fashion increasing on one side until you have used half of your yarn, are happy with the length from long edge to point, or would like to add a motif. After you’ve reached the center (or in other words, the end of your increases) begin decreasing by knitting to the last 3 stitches in the pattern you’ve established, k2tog, k1. Work plain rows in between the decrease rows as established above. Make certain the decreases occur on the same side of your work as the increases or there’ll be trouble of an unspeakable sort.
One note about this method the ratio of long edge length to depth from long edge to point is different than in the Traditional Construction. The long edge length is longer and the depth from the long edge to the point is shallower. This technique creates a shawl that rests beautifully on the shoulders, works well with the ends tied and looks like a shawlette from the back.
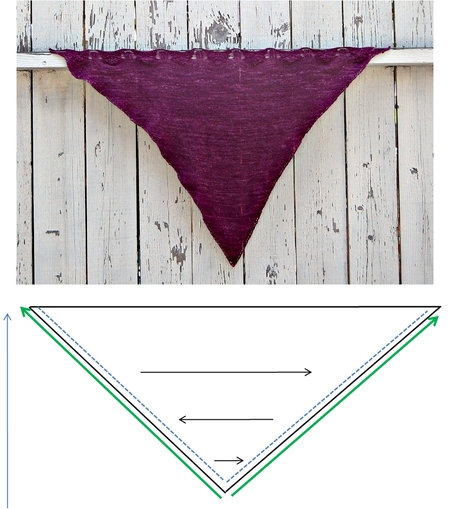
Figure 5 Point to Long Edge Construction
Point to Long Edge Construction
Point to Long Edge is a good way to use every last possible inch of your favorite yarn. The increases are worked on both sides every other row and the simple shaping is great for adding motifs. Another option is knitting plain stockinette to show the character of yarn to its best advantage with a simple motif included in the rows right before the bind off as seen in Figure 5. The finished shape is a lovely an equilateral triangle and looks great tied bandana style around the neck. The cast on and shaping for the Point to Long Edge is shockingly simple.
Cast on 3 Stitches
Row 1: k1, m1, k1, m1, k1 (5 sts)
Row 2: purl all stitches
Row 3: k1, m1, k3, m1, k1 (7 sts)
Row 4: purl all stitches
Row 5: k1, m1, k5, m1, k1 (9 sts)
From this point forward continue the increases on each side and knit plain or patterned according to your whim. When you’re nearly out of yarn or happy with the length from point to long edge bind off all stitches.

Figure 6 Long Edge to Point Construction
Long Edge to Point Construction
Typically Long Edge to Point Construction is worked by casting on a large number of stitches and then decreasing evenly on both the right and left edges down to the point. The decrease rows are worked every other row with a plain stockinette or purl row between working rows. Determine the number of stitches cast on by choosing a motif and finding a number that is a multiple. Think about what you want to happen at the edges of your work as the edge motifs will get absorbed into the decreases. Paired decreases like SSK/K2tog will give the finished edges symmetry. The cast on should be based on the following:
Cast on 300 stitches
Row 1: purl all stitches
Row 2: k1, ssk, knit to last 3 stitches, k2tog, k1
Row 3: purl all stitches
Row 2: k1, ssk, knit to last 3 stitches, k2tog, k1
Where you continue decreasing as established until a handful of stitches remain at which becomes the bind off point. This method allows creativity. You can create regular, repeating motifs, blocks of horizontal stripes by changing yarns at the end of every 10th row, or simply knit plain to indulge the yarn.
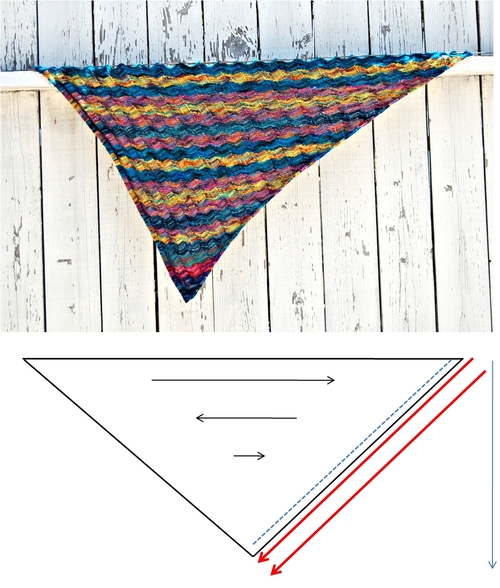
Figure 7 Variation on Long Edge to Point Construction
Long Edge to Point Variation
Eventually you may start to wonder what will happen if you vary from the Construction methods mentioned above. I created the shawl in Figure 7 by following the method for Long Edge to Point Construction except instead of decreasing one stitch on the left and right sides, I decreased by two stitches on the same side every other row. The results lead to an obtuse triangle which drapes beautifully over the shoulders with an extra long edge for tying bandana or wearing it in the style of a shawlette.
I hope the visual representations I’ve presented here will spark your creativity for what can be. You are only limited by your imagination. Live fearlessly, design capriciously and knit endlessly.