
I get a lot of questions asking how to work a Knit On Edging so I thought I’d do a simple and quick tutorial with a few pictures to help give people an idea of what is going on visually.
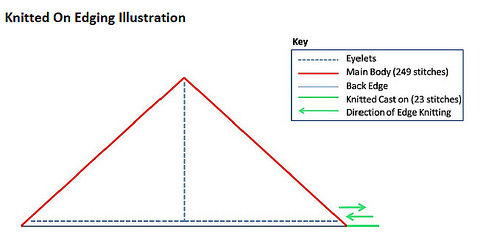
Figure 1
This is a generalized drawing that shows the basics of a Knit On Edging. Note that the Main Body stitches and the Knitted Cast on numbers in the key vary depending on your individual pattern. The red line along the point of the triangle shawl indicates the live stitches that are on your knitting needles and they are left over from the main body knitting instructions. The green arrows show the knit on edging and we’ll be working on how to do that in the following tutorial.
Finished the Main Body of your Shawl and ready to cast on the Knit On Edge? This is what you’ll do!
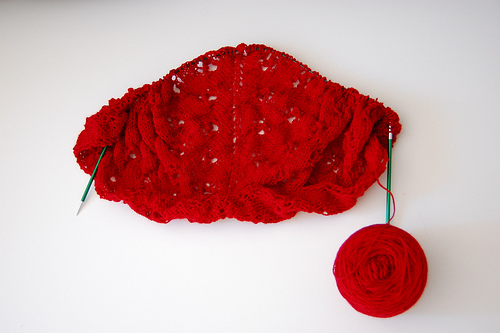
Figure 2
This is what your shawl looks like when you’ve finished the main body of a Fickle Knitter Shawl with a Knit On Edging. The part closest to you is the long edge. For some reason this is hard to visualize and many people assume that is the point, but it’s not! The long edge is closest to you, and the part that will have the knit on edge (and thus, the point of the triangle shawl) is pointing away from you. If you compare this photo to the drawing above, the part closest to your lap is the back edge (shown as a blue line with a row of eyelets in front of it). Please note you are NOT BINDING OFF the live stitches from the main body! Those are left on the needles and you will bind them off one at a time as you work back and forth on the edging.
Once you’ve finished the main body and you’re ready to cast on for the edging, where do you do it exactly?
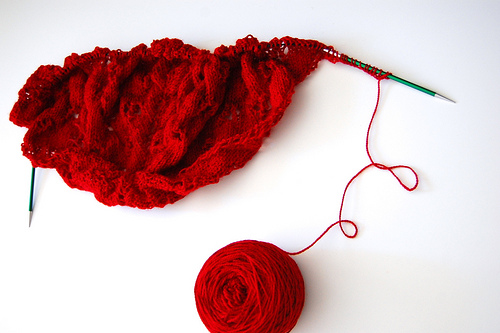
Figure 3
The simple answer is on the right hand side, where your working yarn is located. This is where you cast on how ever many stitches are indicated in the instructions, be it 19 stitches, 21, 23, or what ever the pattern specifies. I recommend using the knit on cast on.
What to do once you’ve cast on your stitches for the Knit On Edging?
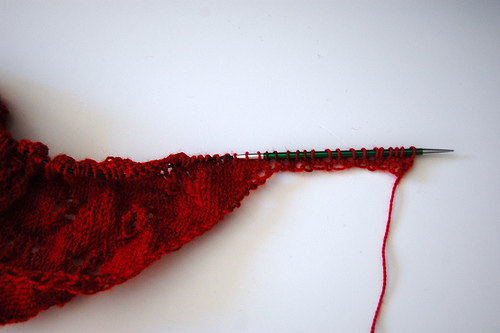
Figure 4
Now all you do is work the first row of the Edge Chart, or Chart C or however it’s referred to in the pattern!
When you get to the very end of the row you will k2tog using ONE stitch from the knit on edging group and ONE stitch from the live stitches from the main body. This reduces your live stitches by one, and puts you one stitch closer to being finished with the shawl.
After you’ve finished the first row of the Knit On Edge chart or written instructions you need to work back to the end of your stitches so that you can work the third row. In order to do this, slip the first stitch and purl the remaining stitches. For example if you cast on 19 stitches for the edge, you’ll slip 1 purl wise and purl 18, going back in the direction you came from. Once you’ve purled all the way back to the end of your right needle you have “reset” your knitting and are ready to knit the next row of your edging. The configuration of your knitting and needles will closely resemble Figures 4 and 5, with the working yarn all the way to the right.
The only real deviation from slip 1 purlwise, purl all remaining stitches wrong side row is if you are on the next row following a double yarn over or larger multiple yarn over increase. Working these double yarn overs becomes second nature if you do them a few times. Basically all you have to do is PURL the first half of the double yarn over on the next row, and KNIT the second half of the double yarn over. Then resume your purling to the end of the row.

Figure 5
Continue working your Knit On Edging Instructions as established, always remembering to slip the first stitch of each purl row. You will see the edging continue to grow in length and the number of live main body stitches will get smaller and smaller.
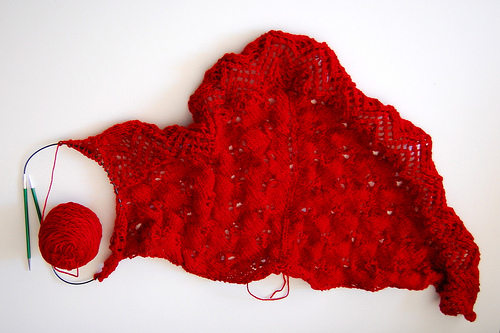
Figure 6
Here’s a photo showing the Whispering Whiskers One Skein Triangle Shawl with the knit on edging nearly complete. When you finish the last row and have k2tog with the last live main body stitch, purl one more row and then bind off all the remaining knit on edging stitches, and that’s it! You’re ready to weave in your ends and block.